Spawn sac machines simplify the process of making spawn sacs.
It is like having a third hand to assist.

Step 1: The spawn sac machine is taped to a piece of cardboard. Normally you would attach the machine to a block of wood using the screws and mounting plate provided with the kit. Sac tying thread is placed onto the arm of the machine.

Step 2: The machine arm is attached to the slot provided on the machine. The tying thread is now secured to the machine.

Step 3: A roll of spawn sac material is placed on the upper machine arm. Spawn sac squares can be used instead of roll material.

Step 4: The sac material is pulled past the jaws of the spawn sac machine. You need a slight overlap of material.

Step 5: A plastic spoon is used to place salmon or trout eggs onto the material. A slight indentation is placed into the material prior to adding the eggs.

Step 6: Using the bottom of the spoon, lightly press the eggs into the material. They should hang just below the jaws of the machine.

Step 7: The side arm is then lowered to close the jaws of the machine. The sac is now securely held in place.

Step 8: The spawn sac is held securely in place by the jaws of the spawn sac machine.

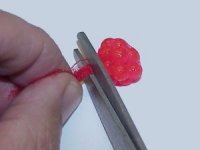
Step 9: Three turns of tying thread is looped around the sac below the locking jaws. The thread is pulled tightly. Then make three more turns and pull tightly again. This will secure the sac.

Step 10: Cut the material with a sharp scissors above the locking jaws.

Step 11: Lift the locking arm and the finished sac will drop into a container under the sac machine.